3 Shiny
Shiny is an R package that allows you to easily create rich, interactive web apps. Shiny allows you to take your work in R and expose it via a web browser so that anyone can use it. Shiny makes you look awesome by making it easy to produce polished web apps with a minimum amount of pain (but there will be some pain).
3.1 Shiny App Structure
Shiny apps are composed of two main elements:
UI: This is where you define the layout and appearance of your app, including sliders, plots, tabs, etc.
The server: This is where you connect your UI components using logic behind the scenes to drive app behaviour.
These two elements are combined to render a shiny app by calling shiny::shinyApp(ui = ui, server = server).
3.2 UI
3.2.1 Setting up the UI
To create a shiny app you must create a UI. Traditionally, in shiny you do this using the functions shiny::fluidPage() or shiny::navbarPage(). The UI will contain elements such as calls to CSS stylings, overall UI design, inputs, and outputs.
3.2.2 Layouts
One of the main things you will set up in the UI is the overall layout and theme. Shiny gives you multiple tools to craft your layout including:
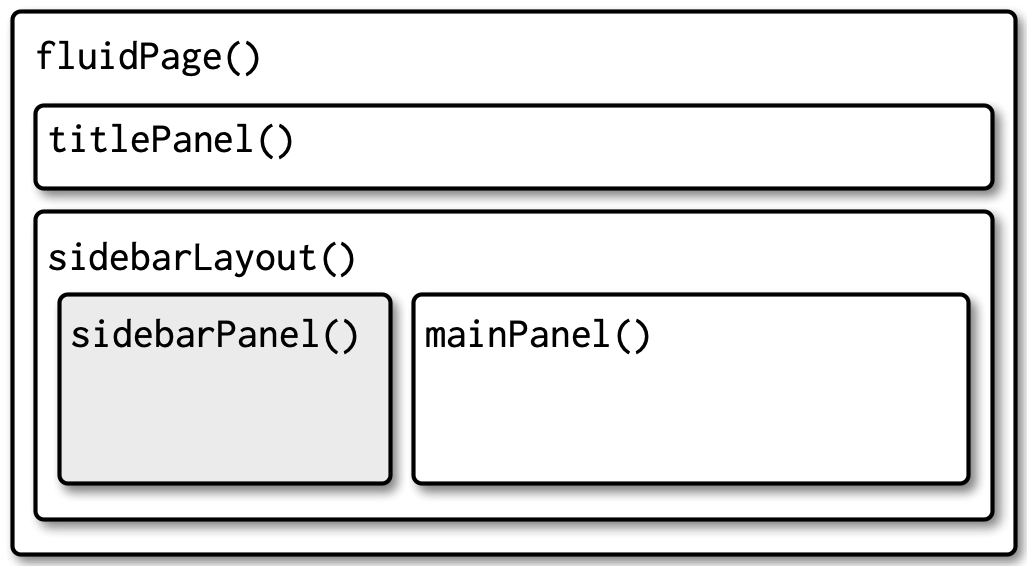
Figure 3.1: Structure of a basic app with sidebar

Figure 3.2: The structure underlying a simple multi-row app
3.2.3 Themes
Beyond the layout, you can also set a theme for your app. Currently, the easiest way to do this is to use the bslib package and set the theme by calling bslib::bs_theme(). There are a number of preset themes you can use, but you are also free to customize your own theme using this function. Read more on themes here.
You can further tweak your app’s look by using custom CSS stylings and by incorporating html code into your UI call. Read more about that here.
3.2.4 UI Inputs
There are a number of inputs that you can use in shiny apps such as shiny::radioButtons(), shiny::selectInput(), shiny::actionButton(), and shiny::dateRangeInput(). These allow users to interact and dictate what appears in our app. Check out the all of the potential inputs here.
These functions all share a two main arguments:
inputID: This is the identifier used to connect the front end with the back end; if your UI has an input with ID “name”, the server function will access it withinput$name.
label: This is used to create a human-readable label for the control (ie. “Select Geography”).
NOTE
The inputId has two constraints:
It must be a simple string that contains only letters, numbers, and underscores (no spaces, dashes, periods, or other special characters allowed!). Name it like you would name a variable in R.
It must be unique. If it’s not unique, you’ll have no way to refer to this control in your server function!
3.2.5 UI Outputs
In the UI we can also specify the outputs that we’d like to include, for example plots, text, or tables; check out the cheatsheet for a list of Output() functions. In essence, these are ‘placeholders’, which will be filled in based on what we define in our server. Similar to inputs, we must also specify an outputID as the first argument.
3.3 Server
On the server side, we build the logic that will power our app. Specifically, we need to fill our outputs and link them to the corresponding inputs if required. We do this by using a different suite of functions that will dictate what we fill our outputs with and using reactivity elements to link inputs to outputs.
3.3.1 Server Inputs
Inputs are essentially data sent from the browser (ie. UI) to the server, which can be accessed by calling input$inputID. Because these are dictated on the browser side, these values are not modifiable (ie. they are read-only) within the server.
The other important point about inputs is we inherently want to use them in a “reactive” context; in other words, we want to have logic that reacts to user input to drive behaviour on the backend to cause some kind of update to the frontend browser. More on this in section 3.3.3.
3.3.2 Server Outputs
Similar to inputs we refer to outputs using their output IDs by calling output$outputID. However, as you may have guessed, instead of receiving inputs from the browser, we are providing outputs to fill in the UI “placeholders”. Outputs are always created using render functions, these may be wrapped in in reactive statements so that they update depending on inputs or they can be stand alone outputs that aren’t connected to any inputs.
3.3.3 Reactivity
Reactivity is what brings everything together in an app. This is where we can use user inputs to update UI and outputs. There are many different types of reactive functions for different purposes; you can make UI and ouputs update in real time, when you click a button, or under other conditions! This is called declarative programming when you set certain constraints and let the program (the server logic) determine when to execute under those constraints. Interestingly, shiny operates lazily, in other words, it will only do the minimum work required to get the job done and only when it has to. We are basically telling shiny to:
“Ensure there is a sandwich in the refrigerator whenever I look inside of it”
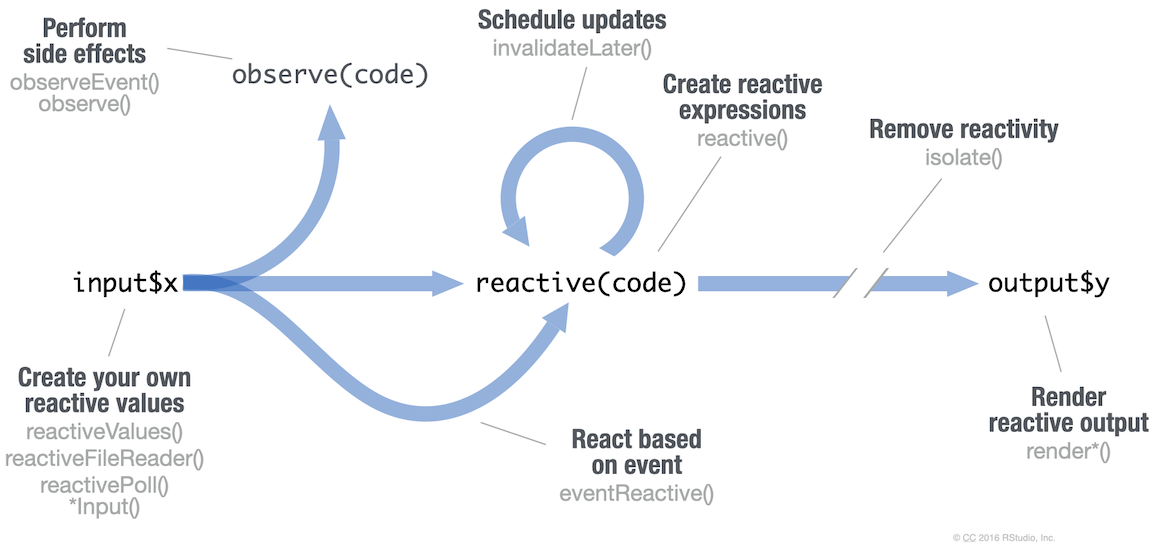
Figure 3.3: The different reactive functions and how they operate.
3.3.4 Execution order
Prepare yourself, this is where we begin to flip all of our coding knowledge on its head. Unlike regular scripts where we expect R to execute things orderly, line by line, shiny server logic doesn’t function this way.. Instead, shiny will only execute specific lines of the server when it has what it needs for that line. For example:
This:
server <- function(input, output, session) {
  output$greeting <- renderText(string())
  string <- reactive(paste0("Hello ", input$name, "!"))
}
will result in the same output as this:
server <- function(input, output, session) {
  string <- reactive(paste0("Hello ", input$name, "!"))
  output$greeting <- renderText(string())
}
TIP
It’s still recommended to have things in order to avoid confusion. But I think it’s an important thing to realize, because it highlights what is truly going on in the background and what makes shiny “lazy”.
3.4 Dynamic UI
We won’t dive too deeply into dynamic UI elements. They essentially function as typical UI inputs, however, they can be used to update the UI by other inputs in a reactive function. This is similar to how we can use inputs to update outputs, except in this case the output is a UI element.
3.5 Basic example
3.5.1 Set up
First we need to do some prep before we build our app. Let’s load our libraries:
NOTE
This is also where we would load datasets, set up global variables, and add paths if we need them for the app. Because this app is super simple we will just load our libraries.
3.5.2 Build the UI
Let’s create a simple UI with shiny::navbarPage() so we have tabs up top, we’ll make one dropdown menu, a couple of plots side by side, and a table that shows the data that is being used in the plots.
library(magrittr)

ui <- shiny::navbarPage(
  # Let's set up our title for the page
  title = 'Appy Hour',
  # Create a drop down list of the flower species
  shiny::selectInput(
    'species',
    label = 'Select Species:',
    choices = c(
      unique(
        datasets::iris$Species
      )
    )
  ),
  # Set up our first tab, which will be for our plot
  shiny::tabPanel(
    title = 'Plot',
    # Let's make two plots but I want them side-by-side so we need to use fluidRow()
    shiny::fluidRow(
      # Within our fluidRow we want two columns that are evenly split
      # (remember 12 is the whole width)
      shiny::column(
        6,
        shiny::plotOutput(
          outputId = 'plot1'
        )
      ),
      shiny::column(
        6,
        shiny::plotOutput(
          outputId = 'plot2'
        )
      )
    )
  ),
  # Set up our second tab, which will be for our table
  shiny::tabPanel(
    'Table',
    shiny::tableOutput(
      outputId = 'table1'
    )
  )
)
3.5.3 Build the server
Now let’s connect everything. We need to use a reactive function to tell shiny to update our plots and table when a new flower species is selected. We also need to fill our plot and table placeholders with render functions.
server <- function(input, output, session) {

  # We need to set up a reactive wrapper, given we are only changing our plot
  # and table as a result of the change of the input
  # for our species the observeEvent() should work perfectly.
  shiny::observeEvent(
    input$species,
    {
      # Filter our data based on the inputs from the UI
      data <- datasets::iris %>%
        dplyr::filter(
          Species == input$species
        )

      # Then because we have outputs we need the corresponding
      # render functions (plot and table) and create our outputs
      # within those and assign them to the placeholders in the UI
      output$plot1 <- shiny::renderPlot(
        plot(data$Petal.Length, data$Petal.Width)
      )

      output$plot2 <- shiny::renderPlot(
        plot(data$Sepal.Length, data$Sepal.Width)
      )

      output$table1 <- shiny::renderTable(
        data
      )
    }
  )

}
NOTE
Remember, the server function requires the same three arguments everytime: input, output, and session.
3.6 Deploying to shinyapps.io
At the BCCDC we have a shinyapps.io account that allows us to publish our apps to their servers. We can set these to be publically viewable, as well as private. Typically, privately deployed apps are for development purposes or previewing prior to public release. To deploy the app you just need to call two functions like so:
rsconnect::setAccountInfo(
      name   = 'bccdc',
      token  = '07A000A33C5EF3D9EDAA3D1CA53339EF',
      secret = 'C2XOcD2ib8Kl2j07icXz9BnZc7DnwKxm9z7PJEz2'
    )

rsconnect::deployApp(
      appName  = "myApp",
      appId    = "This ID gets generated after the initial push to shiny servers",
      appDir   = getwd(),
      account  = 'bccdc',
      upload   = T,
      logLevel = 'verbose',
      appVisibility = c("public", "private"),
      forceUpdate = TRUE
    )
3.7 Packaging a Shiny App
Using package structure for a shiny app gets your toes into the water of package development. It’s a long way from a complete package, but it’s still useful because it activates new tools that make it easier to work with larger app and provides you with standard conventions that can be used across projects.
3.7.1 Put all R code in the R/ directory
Because we are going to be working in an app-package we need to create an R/ directory. This is where we will keep all of the core R code components that will build our app. As a reminder, in a package we are leveraging useful tools like devtools::load_all() (See section 2.3), which will load/run all of the code in the R/ directory.
3.7.2 Write a function that starts your app
As mentioned in section 3.1, we need three primary pieces to create an app:
Now, to begin converting our project to a package-app we must wrap these three things into a function:
myApp <- function(...) {
ui <- fluidPage(
  ...
)

server <- function(input, output, session) {
  ...
}

shinyApp(ui, server, ...)
}NOTE
The function you create shouldn’t need any arguments, all that we will use this for is to easily run our app locally and set it up for easy deployment later by simply calling myApp().
3.7.3 Save your data to the data/ directory
We may have some datasets or lists that we use in our app that aren’t routinely updated. These are perfect candidates to convert into .rda files using the handy function usethis::use_data() that we talked about in section 2.9. These will automatically be stored in the data/ directory and can be easily called directly after running load_all().
TIP
Good candidates for us include things like crosswalk files for health geographies, age categories, and lists (domains, diseases, regions).
3.7.4 Create an inst/ directory
The inst/ directory is where we can store other raw datasets that are more subject to change, for example the data used to feed our apps that comes from external pipelines. There is no standard convention so you can name things as you please, but common usage includes folders named inst/extdata or inst/ext to store these datasets.
NOTE
To load data we need to use system.file() to point to our data’s location, as well as setting the package arugment to our project’s name.
myApp <- function(...) {
  read.csv(system.file("extdata", "mydata.csv", package = "myApp"))
  ui <- fluidPage(
    ...
  )
  server <- function(input, output, session) {
    ...
  }
  shinyApp(ui, server, ...)
}
Notice that our package-app automatically knows to look in our inst/ folder?
3.7.5 Create a www/ directory
This directory is where you can store some of the other non-script or data components to the app such as CSS stylings or images. There are no rules to this but a suggestion would be to have a www/css and www/images sub-directory scheme for your app.
TIP
If you want to call files from within these sub-directories (eg. href = "css/style.css") you will need to tell your app where they are:
3.7.6 Create a DESCRIPTION file
Because we are working in a package environment one of the critical components will be our DESCRIPTION file, which was discussed in section 2.4.
Normally when you deploy an app, the rsconnect package automatically figures out all of the packages your code uses. But because we are making a package-app with a DESCRIPTION file, it requires you to explicitly specify them. The easiest way to do this is to call usethis::use_package(). You’ll need to start with shiny and pkgload:
3.7.7 Deploying your app-package
One of the final pieces to setting up your app-package is the app.R script. This is what will be used when we go to deploy our app to the server and contains two simple but important lines of code:
WARNING
Although this is an R script, we DO NOT place this under our R/ directory. This would result in an infinite loop when running load_all() due to the load_all() function in the script! Therefore place this at the top-level of your project directory.
3.7.8 Workflow
Putting your app code into the package structure unlocks a new workflow:
Re-load all code in the app with
Cmd/Ctrl + Shift + L. This callsdevtools::load_all()which automatically saves all open files,source()s every file inR/, loads all datasets indata/then puts your cursor in the console.Re-run the app with
myApp().